Wednesday, December 11, 2013

Moments

This assignment featured us utilizing rotational tendencies(moments) to better understand the desire for rotation.


Conner Lewis did a great job holding the meter stick

Force Vectors


Manila Folder Bridge


Lauren, Conner and I worked as a team today for this design build challenge.

Criteria: Build a structure that can support as much weight as possible over a 18" gap.

**Magazines will be the weights and two separated tables will be the gap**

Constraints Part I:

Materials:

  • 2 Manila Folders (letter size)
  • 2 feet of tape (may not use a piece of tape longer than 6")
Weighing: 
  • Magazines will be used as "weights"
  • Your "score" for our competition is determined by how many magazines your structure supports!
  • Magazines will be added to your structure one at a time until "failure" is achieved
  • You may place magazines anywhere on your structure as long as:
    • All magazines must rest between the two vertical edges of the gap your bridge is spanning (magazines must be over the "gap")
    • No magazines may tough the tables (magazines may not be piled up to "self support themselves)
Construction Practices
  • Only one end of your design may have a "pinned" connection to the table top (i.e taped). The other end must act as if it were on a "roller" connection (i.e. laying on the table top).
  • Manila folders may not be layered more than 3 layers thick at any location.
  • Parallel structural members may not touch directly (they can be connected via non parallel connection members (ex. a "ladder" style design))
Our Design:
  • Plan 1: fold the manila folders into thirds and place them across the gap connecting them with a few folded strips in the center
  • Plan 2: make a design like the bed of nails on Mythbusters- make a lot of little pyramids out of one folder and then tape them all over the other one that is spanned across the gap to try and distribute the weight of the magazines
  • Plan 3: use the manila folders and fold them into thirds and create a triangular prism place them side by side separated by two inches across the gap
  • Final plan: make the folders into triangular prisms and put one inside the other across the gap


We managed to somehow get 50 magazines on our structure for a brief second before we failed.

Centroids Packet


Monday, December 2, 2013

Beam Deflection

Beam Deflection

My team members were Corin, Conner, Conner, Quinn, and Mark. Using a 2x4, a few phone books and magazines, and a measuring tape we would use beam deflection to try to calculate the weight of a group member.


Mark was our first attempt

Conner L. was our second attempt

It was pretty cool to see how close we could get to the actual weight of the person.

Friday, November 22, 2013

Free Body Diagrams


Free Body Diagrams


Stop Light


Fish Bowl and Logs in container


Mousetrap racecars

Friday, November 8, 2013

Mousetrap Racecar


The first part was challenge to complete was picking a good partner, and that was easy to do.
Quinn and I got the parts to build our car right away and started to brainstorm.

Criteria:
  • Design, build and compete with a Mousetrap Racecar (at least 2 axles).
  • Maintain a clean workspace
Constraints:
  • One mousetrap
  • No more than 12 inches of masking tape
  • Fischertechnique robotics parts
  • No more than 24 inches of string
  • All materials must travel with your vehicle
  • Work through the stages of the event
  • Additional materials by Instructor approval

Achievement #1
"Brainiac"- brainstorm 10 ideas for your design
  1. Dune buggy style- long axles with wheels far away from the body
  2. Really fat tires
  3. Wheels wide set in the back and close in the front
  4. Wheels wide set in the front and close in the back
  5. Use string to secure the axles to the mousetrap
  6. Use tape to attach axle on bottom of the trap
  7. Use a third set of wheel to propel the car
  8. Use the plastic treads to keep the wheels straight
  9. Connect all of the axles together like the wheels of a train
  10. Set off the trap by pulling a piece of string
Achievement #2
"Visualize it!"- Create a sketch of design and label key parts


Achievement #3
"Build it!"- Build your design and document it with a photo
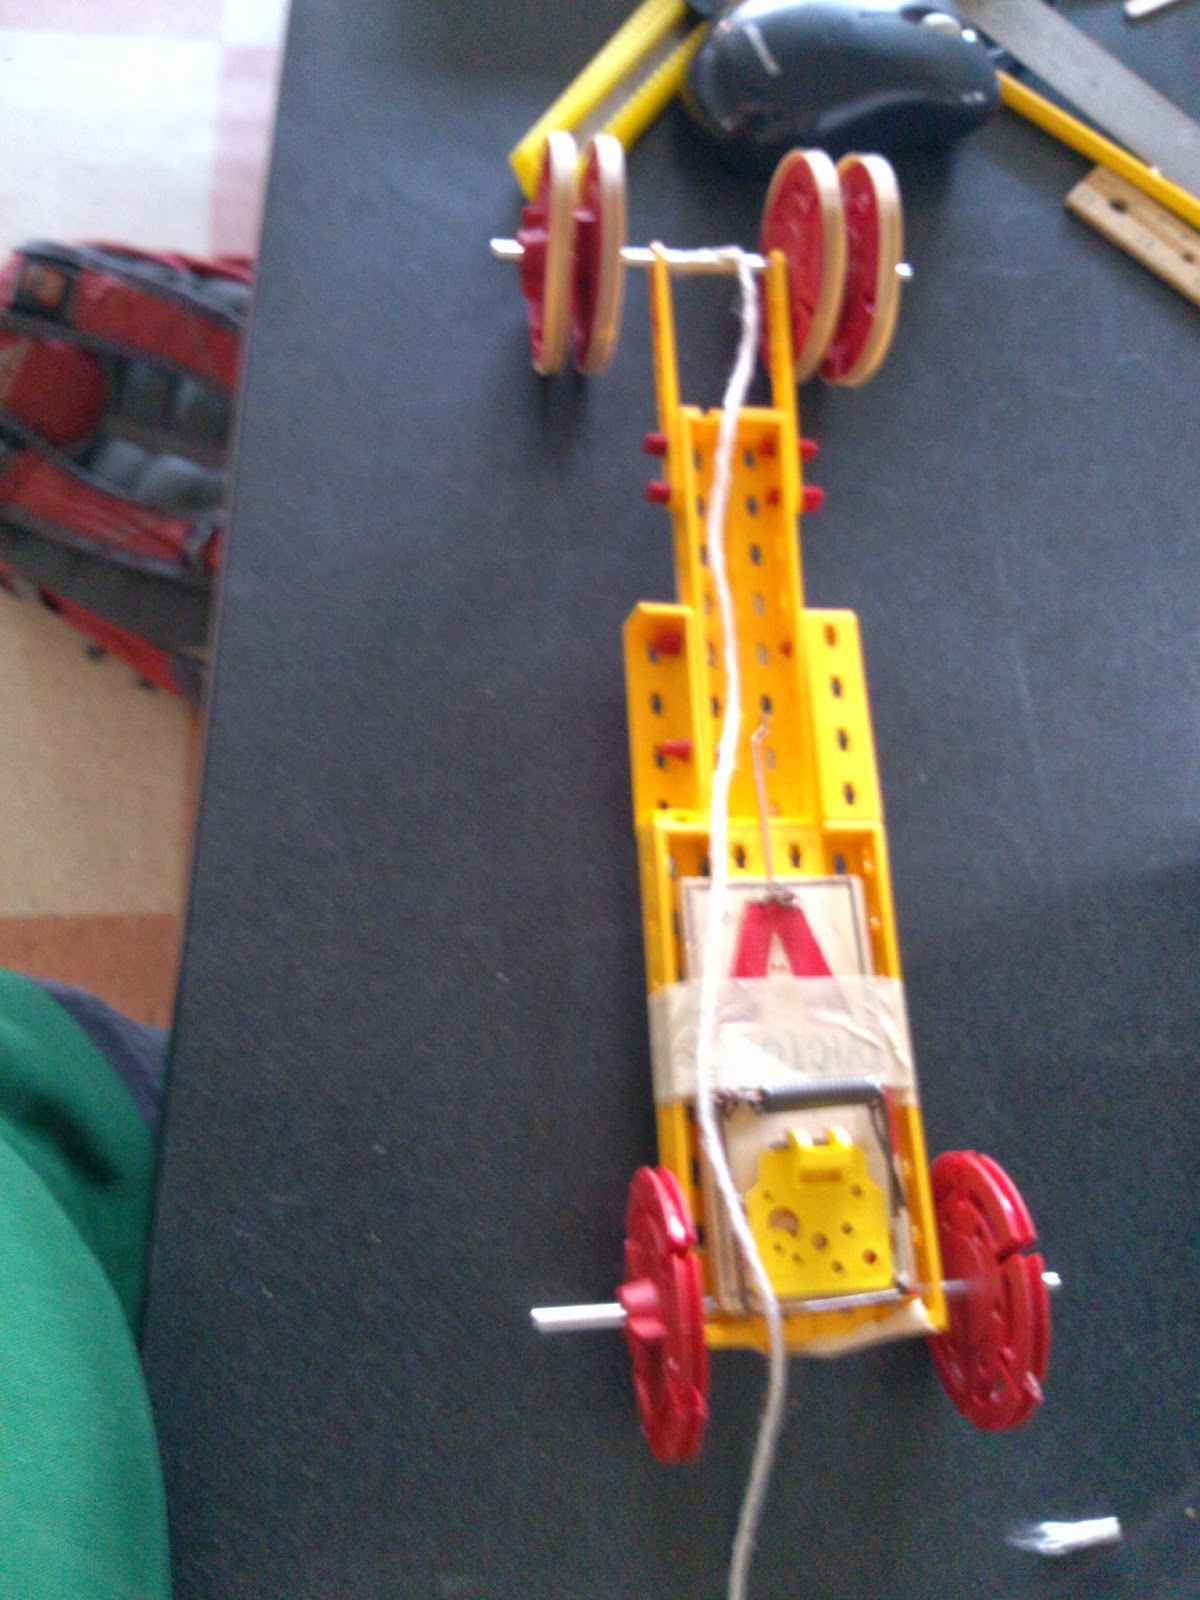
The evolution of our mousetrap racecar


Achievement #4

"The Price of Glory"- If each part you use costs $1, evaluate the total cost of your build
  • 6 wheels: $6
  • 8 yellow building pieces: $8
  • 7 red attachment parts: $7
  • 2 axles: $2
  • 1 piece of string: $1
  • 1 piece of tape: $1
  • 1 mousetrap: $1
Total Cost: $26

Achievement #5

"Competitor"- compete in the 2nd Annual Mousetrap Racecar Challenge

Achievement #6

"Long Distance Winner!"- Travel the furthest in the distance race

Achievement #7

"Feedback"- Collect feedback
  • + We won without adding extended length like
Achievement #8

"Re-work"- Change your build based on the experience with the race/feedback you collected. Document it

-Originally we had rubber bands on the 2 front wheels and the back 4 wheels

Race 1: (original build) We went 7 tiles and place 2nd to last

-We removed the rubber bands off the 2 outer rear wheels

Race 2: (Change 1) We only went 5 tiles

-We put the rubber bands back on the outer 2 rear wheels and removed the middle wheels and axle


Race 3: (Change 2) We went 10 tiles passing our furthest distance

-The string would unwind completely and then would rewind on the axle causing the car to go backwards.       We extended the length of the string a few inches


Race 4: (Change 3) We went 20 tiles and moved into 1st place

-The extra length of the string helped a lot, so we decided to make it a little longer


Race 5: (Change 4) The extra string ended up just getting tangled around the axle and gave us a worse result

Achievement #9

"Game Changer"- Develop a new rule or change to the game that you feel would make the event even better. Explain.

Creative Mode Challenge: Following the acceleration and distance events should be the creative mode challenge
  • Each team during a set amount of time (10 minutes or so) can make a really creative change to their cars.
  • With almost no limitations on what they want to add to it (no motors/battery powered additions)
  • After the new addition have another distance race to see whose car can go the farthest
Achievement #10

"Name it"- Invent a name for an achievement that you think is better than one we currently have.

Change "Brainiac" to "Lightbulb Master": originating from Gru in Despicable Me whenever he comes up with a new idea

Achievement #11

"Leave it Cleaner Than You Found it!"- Did you leave your work space cleaner than you found it? Explain.

We left our work space cleaner than we found it by putting aside working on creating a blog post during class time to help sweep the floor and put away all the pieces of robotics kits covering the tables.

Achievement #12

"Design/Build"- What is a "Design/Build" process? How did your experience with this challenge relate to that? Why might you experience this in a career related to technical innovation?

The process is: define goals/needs of your build, brainstorm, prototype 1: labeled sketch/drawing, collaborate ideas for change, prototype 2: build the sketch, test it, feedback, change, and test again (keep changing and testing until satisfied). For this challenge we built our initial design and tried to just add things to that original idea, until the last minute when we couldn't get it to work. We decided to start from scratch and finally we got our car to move. During the races we changed our build a little bit each time until we were satisfied. When it comes to technical innovation, you won't know how to change things until you test them to see the flaws. You can't test them unless you design and build  them, so if you want to be successful in the field than you will definitely run into some design/build processes.

Centroids


CENTROIDS

Sheet 2
Sheet 1

Wednesday, November 20, 2013

Lever System

Sunday, November 3, 2013

Creating Our Own Pulley System

Our task was to work in a group and create a pulley system with a fixed and movable pulley.


We used a spring scale to measure the amount of force it took to lift the movable pulley and the weight we attached to it. It took .95 Newtons of force to lift it. Then using the pulley system we used the spring scale again to measure the amount of force needed to lift the movable pulley and weight. It took only .4 Newtons to lift the weight. The mechanical advantage is 2:1.

Activity 1.1.2 Simple Machines Practice Problems


We got to take a look at a few different real life problems using simple machines.

Simple Machines: Lever

EX 1:
       A first class lever, in static equilibrium, has a 50 lb resistance forces and 15 lb effort force. The lever's effort force is located 4 ft from the fulcrum.

1. Sketch and annotate lever system described above
2. Calculate:

Actual Mechanical Advantage (AMA)
AMA= Force Resistance/Force Effort
AMA= 50 lbs/15 lbs
AMA= 3.33

3. Static Equilibrium Calculations:

 DR= Distance of Resistance Force
 M= moment (Force x distance)
 Moment Effort + Moment Resistance
-->
-->MFulcrum= 0
(15 lbs)(4 ft) + (50 lbs)(DR)= 0
50 lbs(DR) = 60 lbs/ft
DR= 1.2 ft

EX 2:
       A wheel barrow is used to lift a 200 lb load. The length from the wheel axle to the center of the load is 2 ft. The length from the wheel and axle to the effort is 5 ft.

1. Illustrate and annotate lever system described above
2. Calculate: 
Ideal Mechanical Advantage (IMA)
IMA= Distance(effort force)/Distance(resistant force)
IMA= 5 feet/ 2 feet
IMA= 2.5
3. Static Equilibrium Calculations: 

FE= Force of Effort Force 
M= moment (Force x distance)
 Moment Effort + Moment Resistance

∑ MFulcrum= 0
(200lbs)(2ft) + (5ft)(FE)= 0
5ft (FE) = 400 lbs/ft
FE= 80 lbs

EX 3:
       A medical technician uses a pair of 4 inch long tweezers to remove a wood sliver from a patient. The technician is applying 1 lb of squeezing force to the tweezers. If more than 1/5 lb of force is applied to the sliver, it will break and become difficult to remove.

1. Sketch and annotate lever system described above

2.  Calculate:

Actual Mechanical Advantage (AMA)
AMA= Force Resistance/Force Effort
AMA= 1 lb/ (1/5) lb
AMA= 0.2

3. Static Equilibrium Calculations:

DR= Distance of Effort Force
 M= moment (Force x distance)
 Moment Effort + Moment Resistance

∑ MFulcrum= 0
(4 in)(1/5 lb) + (1 lb)(DE)= 0
1 lb(DE) = (4/5) lb/in
DE= 0.8 in


Simple Machines: Pulley 

EX 1:
       A construction crew lifts approximately 560 lb of material several times during a day from a flatbed truck to a 32 ft rooftop. A block and tackle system with 50 lb of effort force is designed to lift the materials.


1. Calculate: 

Actual Mechanical Advantage (AMA)
AMA= Force Resistance/Force Effort
AMA= 560 lb/50 lb
AMA= 11.2

2. How many supporting strands will be needed in the pulley system?

2 x(# of moveable pulleys) + 1(if changing direction)= # of strands
(2 x 4) +1= 9 strands

Friday, October 18, 2013

Marble Challenge

Marble Challenge
By Quinn, Lauren, Corin, and Connor

Design Build Challenge #2

Release a marble onto a freestanding contraption of our own design located at the edge of our desk.

Materials

  • 14 straws
  • 10 toothpicks
  • 3 paper cups
  • 3 feet of masking tape
  • 1 round marble

Goal:

  • Build a "structure" starting at the edge of the desk
  • Use "structure" to make a marble to end up in a cup on the floor
  • Make the structure go as far as possible from the desk (used to determine score)

Rules:

  • Limited to given materials
  • Marble must end up in a cup positioned on the floor

Results:

  • Team Team created a structure that went 4 and 2/3 tiles
  • The marble made it into the cup and stayed in
  • We scored 1 point after ranking 1st place against other groups
Our design:
  • Placed two straws next to each other and tape them together on only one side
  • Tape the seven pairs together again only on one side
  • To make a more stable track for the marble we place a toothpick in between the straws at each place the seven pair were connected
  • Tape the three cups together bottom to bottom and then top to top
  • Cut the bottom out of the first two cups
  • Stick the 3 remaining toothpicks in the side of the first cup forming a tripod
  • Lastly tape the straws underneath the edge of the table and the cups to the floor


Clean-up Time!


Friday, September 27, 2013

C^3

Cardboard Challenge Achievements 

My group and I are claiming the completion of 9.

Multiple four man teams set out on a challenge to built the best cardboard canoe using duct and of course cardboard. My team and I had to design, sketch and prototype before attempting our built. We decided to go for the most hydrodynamic design possible and proceeded to create a V-bottom design. Once the canoes were completed, the groups placed them into the local pool and began to race back and forth. Our canoe failed miserably and was completely drenched by water and lost all structural integrity. We realized that the V-bottom design was a horrible decision without stabilizers. 

For the sketch ideas , prototype ideas, select an approach, built it, early bird gets the achievement, and v-bottom achievements; every member in my group will testify that we did complete these feats. Unfortunately, all our resources to demonstrate physical are gone. For the feedback achievement, I have a few proposals. For positive ideas, we had hydrodynamics and an attempted v-bottom. For change, get rid of the v-bottom and develop a better way of powering the boat. Some questions I had about the challenge included were we allowed to use rope? kick-boards? For new ideas, I believe that a flat bottom; a hybrid v-bottom/flat top design; bending the cardboard to create curves, or shortening the triangle on the bow would have benefited us greatly. For How low did you go, we went two feet under water. For the make your own achievement achievement, "Drenched boat": have a boat that is completely covered by water float after pulling it out. 

#9 achievements

Friday, September 6, 2013

Wednesday, September 4, 2013

My First Blog Post


My First Blog Post

Welcome to my blog. I wish you to find it an entertaining and enjoyable experience to your liking. I also hope you to find this as a valuable tool to accomplish your goals. Thank you for stopping by. :)


I do cycling as a hobby and have ridden motorcycles before. I find them to be far more enjoyable than the confined space of a car. The wind rushing across your body is unlike anything you can ever experience. 

http://www.google.com/imgres?q=yamaha&safe=active&hl=en&authuser=0&biw=1920&bih=971&tbm=isch&tbnid=bXkr1n5YRWN8lM:&imgrefurl=http://www.mcnews.com.au/Wallpaper/Yamaha/R6/&docid=4lSvKhgQaEw8IM&imgurl=http://www.mcnews.com.au/Wallpaper/Yamaha/R6/2009/2009_Yamaha_YZF-R6_Black_RHF_1280.jpg&w=1280&h=1024&ei=mpUnUtH6LOnaigLNqIEI&zoom=1&ved=1t:3588,r:1,s:0,i:84&iact=rc&page=1&tbnh=180&tbnw=225&start=0&ndsp=36&tx=120&ty=48